Any part of your plan that is drawn (for example Worktops, Walls and Tiles), can be edited by dividing one of the drawn lines/edges into two or more new lines/edges.
Note: Our example uses walls to illustrate the method. However the steps can also be applied to worktops, covering panels, fillers, tiling edges etc.
- In your Alternative, click to highlight the line you want to split.
Note: Ensure you are in the correct definition mode (e.g. for external walls select Room definition mode).
You may need to select the drawing tool you used to originally create the drawn line and click on the Select tool icon in the Tool bar: - Once highlighted, click on the Add point icon in the tool bar or right-click and select Add point.
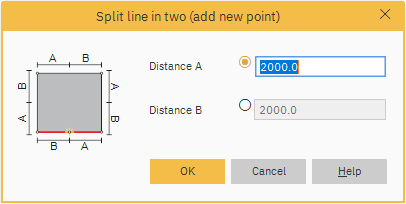
- The Split line in two (add new point) window appears:

The positioning of A and B image is to help visualise distance of each section in the room.
For example, if the top wall of your plan is to be split and the left side is to be 999mm, enter 999 in Distance A. If it is to be on the bottom wall on the left side, enter 999 in Distance B:
- Specify distance A or distance B. If for example you alter distance A then Winner will automatically calculate distance B.
- Click OK.
Note: Repeat steps 1. to 5. if you want to create more than two sections to an edge.
Each of the sections now become separate lines/edges that can be highlighted and changed independently of one another. For example, you can change one edge to an arc or change the edge properties on one of the lines. You can also move or parallel shift an edge.
Related articles
How to delete a point that divides a wall
How to round or arc a worktop corner
Drawing a curved wall
Parallel shift
How to offset part of an external wall
