The Close figure with indicated thickness is a tool used in the following drawing options:
| Draw outer wall | Filler |
|
||
| Draw interior wall | Worktop | |||
| Draw Decor Area | Covering panels | |||
| Free drawing of tiles |
This tool is useful when you require very specific measurements for depth, and also to increase the speed of your drawing. The icon appears in the Tool bar, once you have drawn one line.
Follow the steps below as an example of how to use Close figure with indicated thickness:
In this example an internal wall is being created. This can be done in Room Definition mode or Furnishing mode:
- Click in the plan. Click the Draw interior wall icon:
- Drawing tool icons will now be made available to the right of the Draw interior wall icon. The Draw tool icon
will draw a single line.
- Click at the point where you want to start drawing.
- Click again where you want to complete the line.
- The drawn line should now be highlighted and the Close figure with indicated thickness icon
is now available.
- Click this icon or if you prefer click the white arrow icon
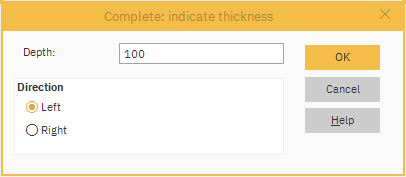
and the following dialog box will appear:

- In the Complete: indicate thickness window specify the depth and direction of the wall.
- In this example, the suggested 100 mm is ok, but the direction needs to be changed to Left (which is anti-clockwise) so the interior wall runs flush with the outer wall.
Note: The direction is calculated relevant to the point of the cursor - Once selected click OK.
- Confirm details in the Interior wall properties and click OK.
The wall has now been drawn with four sides automatically to your indicated thickness.
Related articles
Draw an interior wall
Drawing a back panel
False Wall Properties
