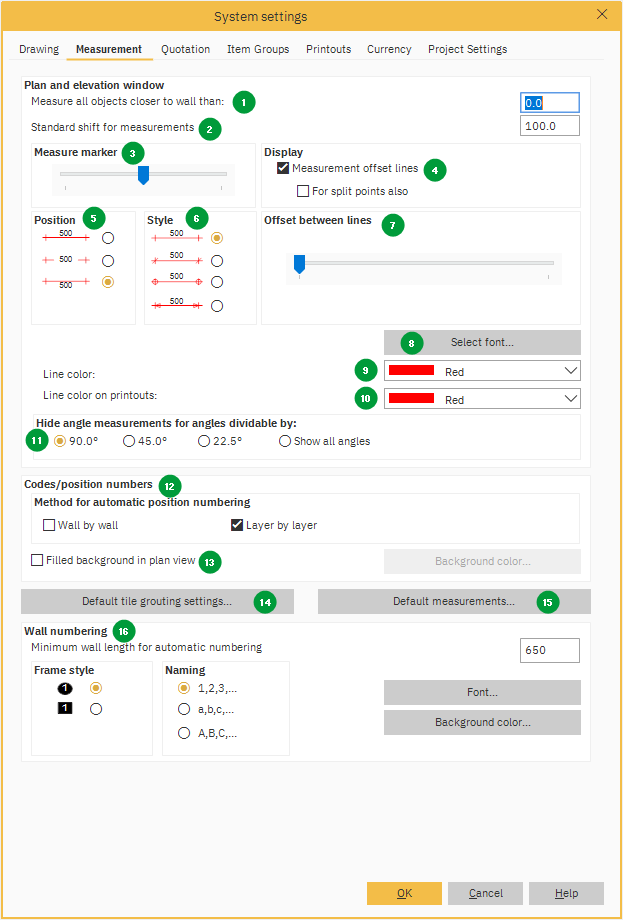
The Measurement tab in System settings allows you to specify how measurements should behave and appear in the drawing.
Access the Measurement tab via Menu option: Global settings > System settings
Change the current alternative:
If you open the menu option Global settings > System settings and select the Measurement tab from the alternative level some of the fields are marked with an asterisk (*) in front of them. If you change any of these fields, the changes will only affect the current alternative, and new alternatives that are possibly created later on in the same milieu on this project.
Change standard setting for new projects:
If you open the menu option Global settings > System settings and select the Measurement tab from the project level, any changes will only affect new projects and alternatives.

- Measure all objects closer to wall than:
Winner automatically measures all objects that are positioned up to a wall. Specify in mm how far from the wall an object can be placed and still be measured in the plan view and elevation. - Standard shift for measurements
In Winner you can move the measurements in the worktop scheme to another position. This can be useful if for example the measurements cross one another.
Here you can specify the distance between the measurements and the worktop in the worktop scheme. - Measure marker
In this field you can adjust the size of the measurement marks.
If you drag the adjustment slider button to the right, the size of the marker will increase and vice versa. - Measurement offset lines
If you don't want to display the dotted line to the measurement-lines in the plan drawing, you have to untick the check box before Measurement offset lines. - Position
In this group box you can define how you want the value relating to the measurement lines to appear in the plan drawing and the elevation drawing. - Style
Select how the measurements are to appear in the drawing, by highlighting the measurement format you prefer.
When an arrow is selected as measurement style, the measurements will look like this in the drawing:
NOTE! When the space between the measurement points is less than 250 mm the arrows will disappear. - Offset between lines
You can choose the distance between the measurement lines by dragging the adjustment slider button. If you drag the adjustment slider button to the right the distance between the measurement lines will increase and vice versa. - Select font
Click on this button if you want to change the font of the measurements (the numbers, not lines).
Change the font, font style, font size, effects and/or color. A preview of the selected settings will be shown in the Sample field. Click OK to save the changes. - Line color
Select the color for the measurement lines from the drop down list. This change will only affect the view on screen (not the printouts). - Line color on printouts
Select the color for the measurement lines on color printouts from the drop down list. - Hide angle measurements for angles dividable by:
If you don't want to show all of the angle measures in the worktop drawing, you can select to hide some of them.
If for instance you select option 90.0°, all angle measurements for angles dividable with 90.0° will be hidden in the drawing. - Codes/position numbers
Select the number positioning of units. Layer by layer will number by the units height layer placement. - Filled background in plan view
Tick this to change the background color of the plan. Click Background color to select the color. - Default tile grouting settings
Click on this button to change the standard settings for joints. - Default measurements
Click this button to change some of the standard measurements in Winner in relation to the room definition mode or standard measurements for accessories/distances to the standard products. This applies to such things as ceilings, window and door heights, etc. See article Default measurements for more information - Wall numbering
In this group box you can define how the wall numbers/names should be presented in the drawing.
In addition you can define the minimum wall length for automatic numbering.
- Minimum wall length for automatic numbering
Enter the minimum length of walls that automatically should be assigned a wall number. Walls with the entered length, or less, will not be assigned a wall number. - Font and Background color
Click on these buttons if you want to change the font or background color inside of the wall number frame.
Related articles
