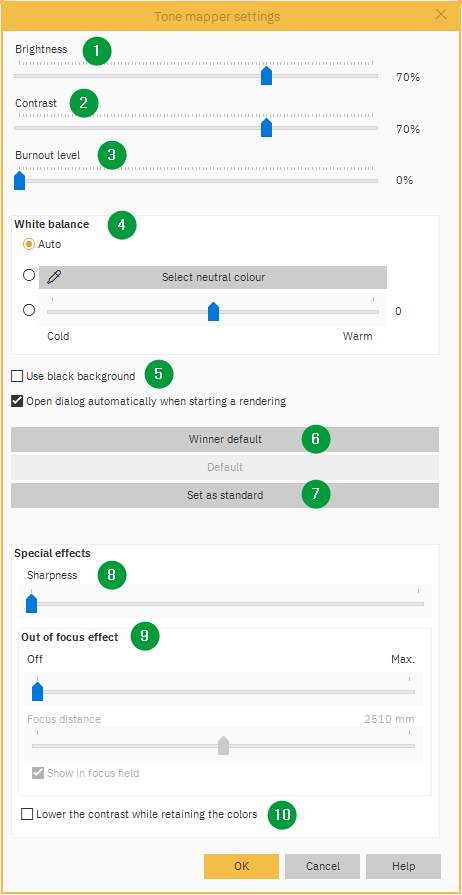
Before you export a rendered image (see Present: Exporting a Design), we recommend doing an on screen render. When you render a perspective on screen (Ctrl + R), the Tone mapper settings window opens automatically. This contains options to enhance/correct your on screen rendering in real time. This saves you time as it allows you to make adjustments before exporting a render as a JPEG image.
Note: If the window does not automatically appear, press Ctrl + T on your keyboard and tick the check box Open dialog automatically when starting a rendering.

- Brightness - This slider increases or decreases the brightness of the image.
- Contrast - This slider increases or decreases the contrast between colours.
- Burnout Level - This will affect the exposure of the image, normally this doesn't need adjusting.
- White balance - Adjusts the colour tones so that the image looks more natural. This defaults to Auto, but if you click the Select neutral colour button, your cursor changes to an eye dropper and you can click on a neutral colour in the image. The Cold/Warm slider bar can be used to adjust the colours.
- Use black background - When in non VR mode, i.e. outside of the room, if you tick this box it makes the area outside of the room black, this can make your image stand out more.
Note: Use Ctrl + M on your keyboard to take you in and out of the room. - Winner default - Click this to reset all options to the standard settings.
- Set as standard - Once you have adjusted the image to your liking, if you want to reuse these settings, you can click this button. It will save your personal settings and activate the Default button so in future if you want to apply your saved settings just click the Default button.
- Sharpness - Increases or decreases the sharpness of things such as edges.
- Out of focus effect - When this is switched on, by moving the slider, you can adjust the Focus distance. When using the Focus distance slider, the area in red will be sharp and the rest will be out of focus or softened.
- Lower the contrast while retaining the colours - Checking this box often gives a more realistic colour balance.
When you are happy with your on-screen image click OK. The adjustments you made will now be applied when you export the rendered design.
Related article