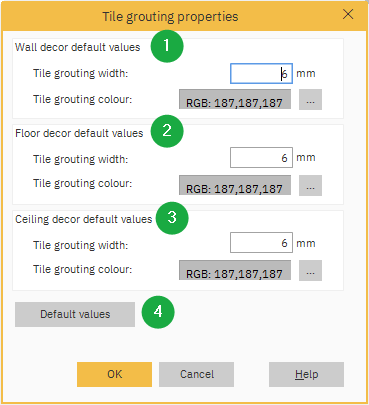
In Winner, you can adjust the Tile grouting properties. For example, the width and the colour of the grouting for tiles placed on the floor, walls and ceiling.
Once you have placed the tiles, to access Tile grouting properties:
- To change properties for all projects going forward:
Select Global settings > System settings > Measurement > Default tile grouting settings... - To change properties for the current alternative:
At Alternative level, select Alternative > Edit materials > Default tile grouting settings...
OR - At Alternative level, click the Edit materials icon
and select the tiled surface in the list - wall, floor or ceiling. Then click Default tile grouting settings... button.
All the above actions will open the Tile grouting properties window:

- Wall decor default values - In this group, the default tile grouting width may be altered for tiles placed on a wall by entering a new value into the field in mm. The default tile grouting colour may be altered for tiles placed on a wall by left-clicking the colour field.
- Floor decor default values - In this group, the default tile grouting width may be altered for tiles placed on a floor by entering a new value into the field in mm. The default tile grouting colour may be altered for tiles placed on a floor by left-clicking the colour field.
- Ceiling decor default values - In this group, the default tile grouting width may be altered for tiles placed on a ceiling by entering a new value into the field in mm. The default tile grouting colour may be altered for tiles placed on a ceiling by left-clicking the colour field.
- Default values - Click this button to return the settings to default values.
Related articles
How can I add my own tiled image